
A la hora de hacer upgrade de InfluxDB siempre tendremos como referencia principal la documentación del producto que es bastante clara para los distintos escenarios en los que nos podemos encontrar. En este artículo comento mi caso particular de forma práctica, especialmente por la integración de Collectd que a partir de InfluxDB v2 se complica un poco, pues no tiene integración nativa de otros colectores y deberemos utilizar Telegraf para ello.
El proceso de actualización consta de:
- Subida de versión del software de InfluxDB, ya lo hayamos instalado con un gestor de paquetes (mi caso), descargado binarios o Docker.
- Migración de la configuración y datos de las distintas instancias de BD.
- Integración de colectores distintos a Telegraf, como Collectd.
Upgrade
Aunque los datos originales se van a mantener en /var/lib/influxdb/data y sólo se van a migrar a un nuevo esquema compatible con InfluxDB v2, conviene hacer backup previo al upgrade como buena práctica.
Una vez realizado el backup, procedemos a actualizar InfluxDB con nuestro gestor de paquetes correspondiente:
yum update influxdb
apt-get update influxdb
Una actualizado el paquete a la versión 2, tendremos que migrar los datos y configuración antiguos:
[root@jota-node01 ~]# influxd upgrade -e /var/lib/influxdb/engine/ -c /etc/influxdb/configs -m /etc/influxdb/influxd.bolt --config-file /etc/influxdb/influxdb.conf --v2-config-path /etc/influxdb/
Donde:
- -e es donde se van a migrar los datos (buckets) que anteriormente estaban en /var/lib/influxdb/data. Recomendable que esté en un filesystem dedicado, en mi caso aprovecho /var/lib/influxdb.
- -c donde se van a dejar las configuraciones.
- -m para el fichero de configuración bolt.
- –config-file Fichero de configuración de InfluxDB 1.x que leerá el upgrade para generar el config.toml.
- –v2-config-path Indica dónde se dejará el fichero de configuración de InfluxDB 2 (config.toml).
Una vez lanzado, comienza el proceso de upgrade. Primero lee el fichero de configuración /etc/influxdb/influxdb.conf para generar el correspondiente para la V2:
{"level":"info","ts":1605448611.8570254,"caller":"upgrade/upgrade.go:326","msg":"Starting InfluxDB 1.x upgrade"}
{"level":"info","ts":1605448611.8570824,"caller":"upgrade/upgrade.go:329","msg":"Upgrading config file","file":"/etc/influxdb/influxdb.conf"}
{"level":"info","ts":1605448611.8589108,"caller":"upgrade/config.go:109","msg":"Config file upgraded.","1.x config":"/etc/influxdb/influxdb.conf","2.x config":"/etc/influxdb/config.toml"}
{"level":"info","ts":1605448611.8589327,"caller":"upgrade/upgrade.go:354","msg":"Upgrade source paths","meta":"/var/lib/influxdb/meta","data":"/var/lib/influxdb/data"}
{"level":"info","ts":1605448611.8589435,"caller":"upgrade/upgrade.go:355","msg":"Upgrade target paths","bolt":"/etc/influxdb/influxd.bolt","engine":"/var/lib/influxdb/engine/"}
{"level":"info","ts":1605448611.8648605,"caller":"bolt/bbolt.go:67","msg":"Resources opened","service":"bolt","path":"/etc/influxdb/influxd.bolt"}
{"level":"info","ts":1605448611.8661997,"caller":"migration/migration.go:241","msg":"Migration \"initial migration\" started (up)","service":"migrations"}
{"level":"info","ts":1605448611.9202006,"caller":"migration/migration.go:241","msg":"Migration \"initial migration\" completed (up)","service":"migrations"}
{"level":"info","ts":1605448611.9202724,"caller":"migration/migration.go:241","msg":"Migration \"add index \\\"userresourcemappingsbyuserindexv1\\\"\" started (up)","service":"migrations"}
{"level":"info","ts":1605448611.9240263,"caller":"migration/migration.go:241","msg":"Migration \"add index \\\"userresourcemappingsbyuserindexv1\\\"\" completed (up)","service":"migrations"}
{"level":"info","ts":1605448611.924062,"caller":"migration/migration.go:241","msg":"Migration \"migrate task owner id\" started (up)","service":"migrations"}
{"level":"info","ts":1605448611.9266145,"caller":"migration/migration.go:241","msg":"Migration \"migrate task owner id\" completed (up)","service":"migrations"}
{"level":"info","ts":1605448611.9266608,"caller":"migration/migration.go:241","msg":"Migration \"create DBRP buckets\" started (up)","service":"migrations"}
{"level":"info","ts":1605448611.9324465,"caller":"migration/migration.go:241","msg":"Migration \"create DBRP buckets\" completed (up)","service":"migrations"}
{"level":"info","ts":1605448611.9324844,"caller":"migration/migration.go:241","msg":"Migration \"create pkger stacks buckets\" started (up)","service":"migrations"}
{"level":"info","ts":1605448611.936836,"caller":"migration/migration.go:241","msg":"Migration \"create pkger stacks buckets\" completed (up)","service":"migrations"}
{"level":"info","ts":1605448611.9368694,"caller":"migration/migration.go:241","msg":"Migration \"delete sessionsv1 bucket\" started (up)","service":"migrations"}
{"level":"info","ts":1605448611.9455585,"caller":"migration/migration.go:241","msg":"Migration \"delete sessionsv1 bucket\" completed (up)","service":"migrations"}
{"level":"info","ts":1605448611.9456105,"caller":"migration/migration.go:241","msg":"Migration \"Create TSM metadata buckets\" started (up)","service":"migrations"}
{"level":"info","ts":1605448611.9494073,"caller":"migration/migration.go:241","msg":"Migration \"Create TSM metadata buckets\" completed (up)","service":"migrations"}
{"level":"info","ts":1605448611.9494305,"caller":"migration/migration.go:241","msg":"Migration \"Create Legacy authorization buckets\" started (up)","service":"migrations"}
{"level":"info","ts":1605448611.9542875,"caller":"migration/migration.go:241","msg":"Migration \"Create Legacy authorization buckets\" completed (up)","service":"migrations"}
{"level":"info","ts":1605448611.9543195,"caller":"migration/migration.go:241","msg":"Migration \"Create legacy auth password bucket\" started (up)","service":"migrations"}
{"level":"info","ts":1605448611.960495,"caller":"migration/migration.go:241","msg":"Migration \"Create legacy auth password bucket\" completed (up)","service":"migrations"}
{"level":"info","ts":1605448611.960521,"caller":"migration/migration.go:241","msg":"Migration \"add index \\\"telegrafbyorgindexv1\\\"\" started (up)","service":"migrations"}
{"level":"info","ts":1605448611.964165,"caller":"migration/migration.go:241","msg":"Migration \"add index \\\"telegrafbyorgindexv1\\\"\" completed (up)","service":"migrations"}
{"level":"info","ts":1605448611.9641902,"caller":"migration/migration.go:241","msg":"Migration \"populate dashboards owner id\" started (up)","service":"migrations"}
{"level":"info","ts":1605448611.9667575,"caller":"migration/migration.go:241","msg":"Migration \"populate dashboards owner id\" completed (up)","service":"migrations"}
Contestamos las preguntas. En mi caso mantengo la retención de datos de 3 meses:
Welcome to InfluxDB 2.0 upgrade!
Please type your primary username: jota

Please type your password:

Please type your password again:

Please type your primary organization name: jotaorg

Please type your primary bucket name: jota_bucket

Please type your retention period in hours.
Or press ENTER for infinite.: 2160


You have entered:
  Username:          jota
  Organization:      jotaorg
  Bucket:            jota_bucket
  Retention Period:  2160 hrs
Confirm? (y/n): y
Si todo ha ido bien veremos:
{"level":"info","ts":1605115637.1993477,"caller":"upgrade/security.go:40","msg":"User is admin and will not be upgraded.","username":"jota"}
{"level":"info","ts":1605115637.1993635,"caller":"upgrade/upgrade.go:431","msg":"Upgrade successfully completed. Start service now"}
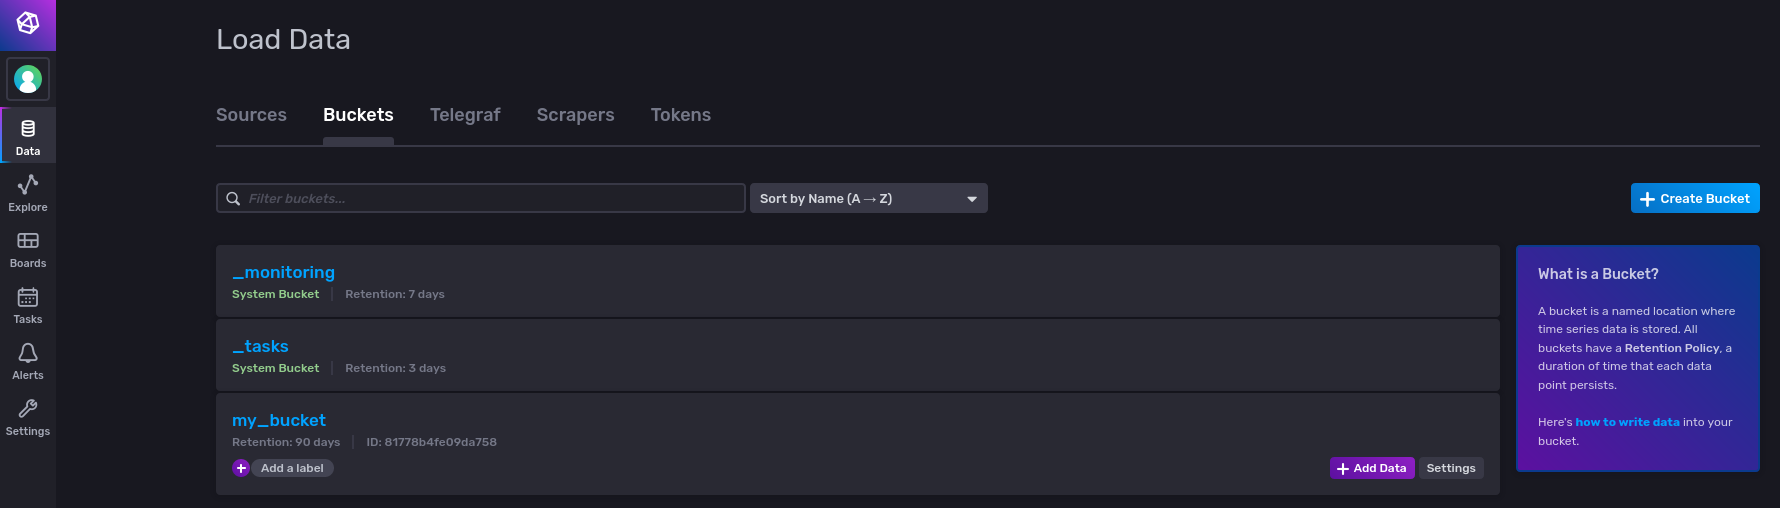
Una vez realizada esto arrancamos los servicios correspondientes y vamos a http://localhost:8086. Recuerda el usuario administrador que creaste durante el upgrade, en mi caso jota. Una vez dentro de la interfaz de administración en Data -> Buckets debemos ver my_bucket que tendrá todos los datos migrados de InfluxDB v1
Integración de Collectd con InfluxDB
InfluxDB 2.x no permite integraciones directas de otros colectores como por ejemplo Collectd. Ahora necesitamos Telegraf, que hará de proxy entre el colector e InfluxDB. El siguiente ejemplo se basa en Collectd.
Configuración Input
En /etc/telegraf/telegraf.d/inputs-socket_listener.conf creamos un listener para recibir los datos de collectd:
[[inputs.socket_listener]]
  service_address = "udp://:25826"

  ## Data format to consume.
  ## Each data format has its own unique set of configuration options, read
  ## more about them here:
  ##   https://github.com/influxdata/telegraf/blob/master/docs/DATA_FORMATS_INPUT.md
  data_format = "collectd"

  ## Authentication file for cryptographic security levels
  #collectd_auth_file = "/etc/collectd/auth_file"
  ## One of none (default), sign, or encrypt
  #collectd_security_level = "encrypt"
  ## Path of to TypesDB specifications
  collectd_typesdb = ["/usr/share/collectd/types.db"]

  ## Multi-value plugins can be handled two ways.
  ## "split" will parse and store the multi-value plugin data into separate measurements
  ## "join" will parse and store the multi-value plugin as a single multi-value measurement.
  ## "split" is the default behavior for backward compatability with previous versions of influxdb.
  collectd_parse_multivalue = "split"
Configuración output
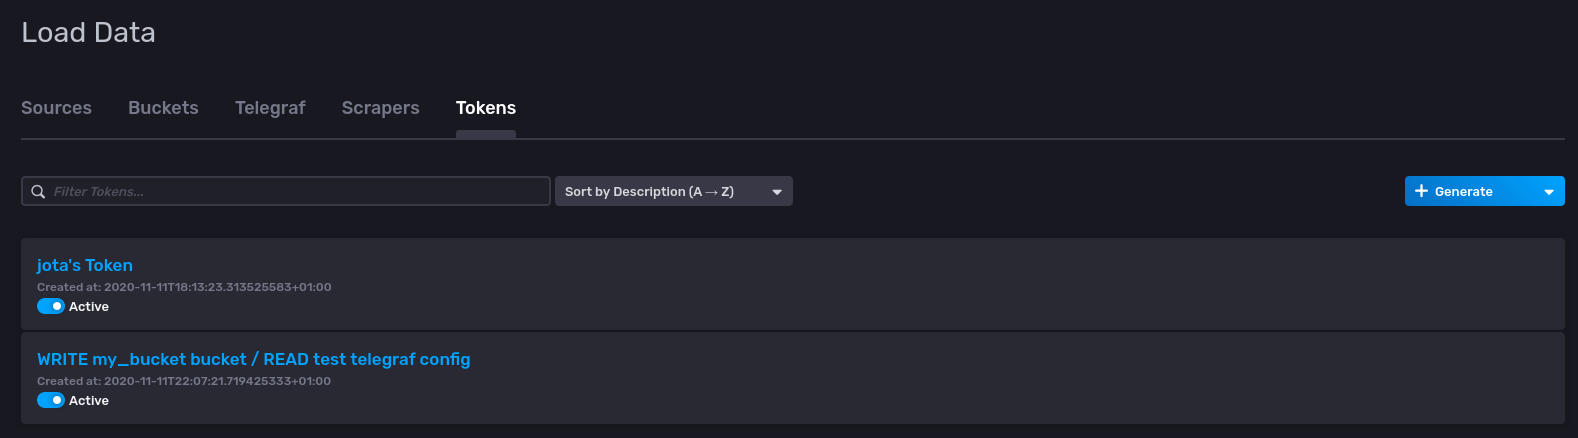
Independientemente de que necesitemos integrar los datos que provienen de otros colectores como Collectd, necesitaremos configurar siempre un output de Telegraf que escribirá en el bucket correspondiente. Necesitamos un token de lectura/escritura que podemos generar en la interfaz de administración en Data -> Token
Una vez generado, creamos la variable INFLUX_TOKEN en /etc/default/telegraf:
INFLUX_TOKEN=mi_token
Generamos ahora una configuración output en /etc/telegraf/telegraf.d/outputs.conf con el siguiente contenido:
[[outputs.influxdb_v2]]
  ## The URLs of the InfluxDB cluster nodes.
  ##
  ## Multiple URLs can be specified for a single cluster, only ONE of the
  ## urls will be written to each interval.
  ## urls exp: http://127.0.0.1:8086
  urls = ["http://127.0.0.1:8086"]

  ## Token for authentication.
  token = "$INFLUX_TOKEN"

  ## Organization is the name of the organization you wish to write to; must exist.
  organization = "jotaorg"

  ## Destination bucket to write into.
  bucket = "my_bucket"
Ahora todos los datos de Telegraf, tanto los nativos del colector como los integrados mediante inputs, se escribirán en el esquema my_bucket.